Wildcrafting in our yard – Wild Leeks

Wild Leeks
Wild Leeks – the longer leaved plants in this picture.

I found out from my mom last year that we had a patch of wild leeks (also called ramps) growing in the woods behind our house.  We have a ton of daffodil patches in our yard and the woods surrounding it, and last year I wasn’t really sure what I was looking for.  I figured it out this year though because the leaves are quite different.  Our neighbor confirmed it for us because he pointed them out to my husband.  So I went and picked some, and looked them up online to make sure that they were, in fact, wild leeks.  It’s always a good idea to definitively confirm things before eating something that may not be what you think it is.

I picked some tonight to cook with dinner, and they are really good.  I had read that they taste kind of like a mix between onion and garlic.  I fried them up with some pork steaks we had, and they had a nice mild oniony-garlicky flavor to them.

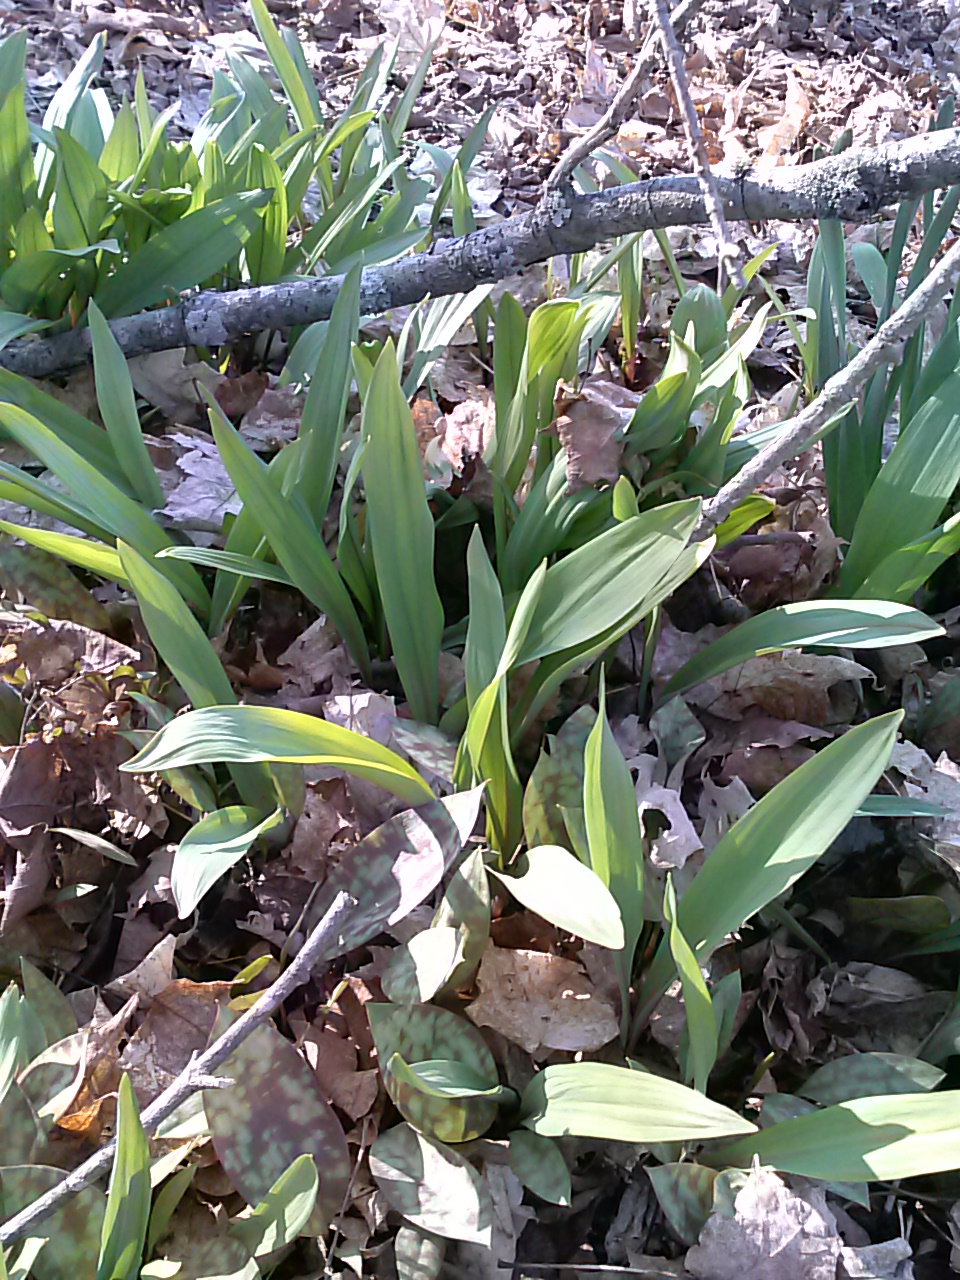
In the picture above you can see, mixed in among the leeks, some little mottled/spotted leaves.  I’m not sure what they are.  If you read this blog and you know what these may be, please leave me a comment.  I don’t remember seeing them last year.  There are a ton of them and they don’t seem to be something that just has a disease, it appears to be the natural coloring of the plant.  Here is another picture of just the mottled leaves:

mystery spotted leaf plants
Mystery spotted leaf plants.

Like I said above, we have tons of daffodils, all different kinds, all over in our yard and woods. My mom planted different varieties over the years.  When my parents would divide them, they would throw the old plants in the woods, and the daffodils have just taken off.  It has a nice effect, especially this time of year when there’s a tiny bit of green and a whole lot of brown – there are splashes of yellow and white and cream (and mixtures of those) all over the place.  Here’s a nice yellow one:

A daffodil in our yard.

And then we had 26

We now have 26 chickens – I received the new babies today! They were replacements for the dead chicks we received in March. The ten we received today are all alive and doing well. Luckily it was a lot warmer this time for their travel, although we did get an inch of snow this morning.   A couple of the chicks were a tiny bit sluggish this morning but are now eating and drinking ok, and running around with everyone else.

New chicks in their brooder box

Here are the new chicks:

This little one has a top-knot, which means it will have a fluffy feathered head.  Most likely some type of Polish chicken.
This little one has a top-knot, which means it will have a fluffy feathered head. Most likely some type of Polish chicken.*
A little small yellow and gray chick - this one was a little sluggish this morning. He's smaller than everyone else.
A little small yellow and gray chick – this one was a little sluggish this morning. He’s a little smaller than everyone else.*
This one is a brown and yellow mixture
This one is pale/white with a darker grayish head. Its fuzz seems a tiny bit loner than most of the others. It also has feathered legs
This one is pale/white with a darker grayish head. Its fuzz seems a tiny bit longer than most of the others. It also has feathered legs.
A little orange chick. This one cheeps a lot and very loudly.
These two look like twins, they are both brown with feathered legs, like my older feathered leg one from the last batch.
This is a Dorking - you can tell by its toes - it has 5 instead of the typical 4.
This is a Dorking – you can tell by its toes – it has 5 instead of the typical 4.
A close up of the Dorking's toes.
A close up of the Dorking’s toes.
This is a brown stripey chick.  It has black stripes down its back.
This is a brown stripey chick. It has black stripes down its back.
Here's a little black and silver chick.
Here’s a little black and silver chick.

I made a brooder box for them out of 3 cardboard boxes that I taped together – smaller than the last brooder, so it will be a lot easier to deal with and to disassemble when they go outside.

They’re all doing great so far.

Here they are all together.

* Update 4/24 – The two chicks that had been sluggish when we first got them died. The little yellow one (2nd single-chick picture, above) was gone by Thursday morning, and then the little Polish chick (the top-knot chick, first single-chick picture above) died Thursday afternoon.  I wish I knew what happened, but I think sometimes there is something internal that just doesn’t form correctly.  Everyone else is doing well as of tonight (Friday).

The chickens have left the building!

I have been scrambling to get the chicken coop ready to house my baby chicks, and keep them separate from the adult chickens.  My goal was to get it done by the end of this weekend –  I ended up ahead of schedule, and it was done (enough) by today to put them in.   That leaves me tomorrow (Sunday) to start with the yard work I’ve been wanting to get to.

Our chicken house is an old sauna building, split into two rooms.  The back room is where our adult birds are.  The front room was used for storage until today.  When we originally started working on the sauna to get it chicken-ready, we gutted it down to the wall studs, and then lined the whole thing with plastic. We had some nice plastic tarping that I figured would work as a wind break, since the building is so old. The back room was then lined with plywood & particle board to make actual walls.  We left the front room unfinished until today.

I had a lot of smaller scraps of particle board that my dad had saved for who-knows-what, so that is what I used to wall up the front room.  I did most of the walls, but there are a few that still need the upper portions covered.  We have some other wood that we will cut to use to fill the spaces that are still left, but for now, it is covered enough for the chicks.  We didn’t want them chewing the plastic.  Here are some photos – the sun was glaring into the building so the pictures aren’t that great:

New Chicken room 1
Part of the new chicken room, where most of the bedding is.
The other side of the new chicken room - the door shown here leads to the back room (the adult chicken's part).
The other side of the new chicken room – the door shown here leads to the back room (the adult chicken’s part).

Our plan once everyone is integrated together is to take down the door that separates the two rooms, create a closet space to the side for their food, and make it one giant chicken palace.

I also built a temporary outside run for the chicks, just a little 8×8 (approximately) with some chicken wire.  Here they are enjoying the outside:

The chicks in their new temporary pen
Another shot of them in their pen - it was late in the day so the sun was messing up my pictures.
Another shot of them in their pen – it was late in the day so the sun was messing up my pictures.

I want to keep them separated from the adults for the next several weeks – I’ve heard 10-12 weeks is a good age to integrate them.  But at least they can see each other outside and hear each other inside the coop, so they’ll be somewhat familiar with each other by the time they are old enough.  Now I just have to figure out how I’ll integrate the new chicks I’m getting sometime this week.  They will be in my spare bedroom like these babies were, but hopefully for not as long.

Today I also ended up giving away one of my adult roosters.  I had two, and my neighbor had asked if we had an extra, since he only had hens.  I was planning on keeping both of them, but they have recently started fighting.  My big orange Buff Orpington had started picking on my Silver Laced Wyandotte, and then they’d fight.  They don’t have spurs (I’m not sure if those develop at some point later?) but they have nubs on their legs where spurs would be if they were to grow.  I traded my Buff Orpington to the neighbor today for some horse manure; He’s going to drop it off sometime in the next few weeks so I can use it in my compost.

My remaining rooster seems pretty happy since he’s not getting picked on anymore:

My silver Laced Wyandotte rooster.

Wizard (the Purrface).

Our house/farm kitty, Wizard

We got a cat last fall, because we have mice and I needed a way to get rid of them – traps had not worked and I didn’t want to use poisons.  I found our cat’s picture on a website for a local shelter, and they said he was good with dogs, other cats, and kids.  He is great with my son, but he hates other cats (I found out at the vet’s office) and he is deathly afraid of my dogs.  We named him Wizard, and he lives in the upstairs of our house.  He stays up there because the dogs are downstairs.   My son Daniel added “the Purrface” to his name – Wizard the Purrface.

Wizzie coming to get petted.

The shelter said he was found in the woods near someone’s camp. They kept him with them while they were there and then dropped him at the shelter when they left to go home.  They told the shelter he was great at catching mice at their camp.  Since I’ve had him, he’s been an excellent mouser, and we no longer have mice upstairs.  He sometimes leaves us little “gifts” on the floor as proof of his hunting skills.  It turns out one of my dogs can catch mice downstairs, so that helps the downstairs mouse situation.

I’ve kept him inside since we got him, because at first I was afraid he may run away, and since he’s afraid of the dogs I didn’t think he’d come back inside.  He is a big lovey-dovey though, and he loves us a lot (or at least loves us petting him),  so I figured he would come back to us if I let him outside.  He has his claws and his rabies shots, so he is relatively safe outside unless he runs near the road.  This weekend it was beautiful out, with sunshine and temps in the 70s, so we brought him outside – I had to carry him past the dogs, him clinging onto me for dear life, till we got out the door.  Then he immediately wanted down.

He did really well outside, wandering around checking out the woods near our house.  My son followed along to see what he was doing.  Daniel was afraid he’d try to run away, but I told him that if Wizard wanted to run, he’d would have run immediately.  He kept coming back to get petted and then wandering away again.  I let him outside for about an hour on Saturday, and then a few hours on Sunday while we were out doing yard work.  Our yard is pretty mucky from the snow melting, so there were big chunks of the yard he avoided, but I think it will be nice this summer for him to come out while we’re outside.  If he can ever get over his fear of the dogs, so he would come in on his own past them, I would just let him be “inside/outside,” but for now he is just going to come out while we’re doing work outside.

Tiny Rooster

My 6 chicks are getting pretty big.  They have been hopping up and perching on the edge of their giant box.  I am starting to plan out how to move them outside.

They are getting big

They are still too young to go with the adults, but they have their feathers in mostly, and it’s getting warmer now.  I have an extra room in the chicken house that I’ve been using for storage – that is now getting cleaned out and we’ll be expanding that this summer to make room for all the newbies.  I think we are going to put the babies in there early, possibly next weekend if we can get it ready in time.  We’ll have to time the letting-out of everyone to keep the big chickens away from the little chickens, but it’s do-able.  I need to also make some kind of small fenced-in area for the babies for awhile, so they have somewhere to go during the day.   I need to get them outside soon because they are getting large and trying to escape the box, and they are making the room they are in very dusty, and also we have new baby chicks coming next week –  AND, because this guy has started crowing:

The black chick with the large comb is now crowing.
The black chick in the middle with the large comb is now crowing.

It’s a very strange sound, because he’s not fully grown. The first time I heard it, last week (when he was only 5 weeks old), I was afraid one of them was hurt – I ran into the room and they were all fine. I sat for a minute to see if they would make the noise again, and he made the noise – it’s not a full on “cock-a-doodle-doo” crow, but more like a hoarse “eee-awww” noise.  It’s pretty cute.   I’d like to get him outside because we are starting to be able to hear his crow across the house.  I hope at least a few of these babies are hens.

Seedlings

Some various flower seedlings

My seeds are sprouting! Its exciting.  I have them in the seed trays and keep the domes on most of the day, taking them off for a couple hours, just to keep the moisture from being too much – I don’t want any mold to form. They are in a sunny window and also have a grow light.

My tomato seedlings
My tomato seedlings

I’ve got charts for each seed tray, so that I know which plants are which.  I have noticed that the strong sunlight coming through the window attracts them a little more than the grow light above, so the tomatoes have been “reaching” for the sun.  I have been turning the peat pellets instead of the trays, just so I don’t get lost in my grid of seedlings, and forget what is where.   I also decided to try to keep track of germination, or at least how long each kind of plant takes to germinate.  Here’s my chart for this round of seedlings:

seed germination chart
My germination chart

I just marked down the date I planted the seeds, and the first date I saw sprouts.  It will be helpful in later years in case I come across a batch of bad or old seeds or something.

Most of our snow is now gone also, so I’ve been thinking about how best to start the new garden beds.  I’m going to need some cardboard so I can do a lasagna-style garden.  It’s a lot easier than digging up grass.  Lasagna-style gardening is where you first layer paper (cardboard, newspaper, or paper bags) over the grass, and then layer compost, leaves, and soil to make a garden bed.  The compost-type things break down under the growing plants, and the first layer of cardboard/paper keeps the grass and other weeds from growing up into the bed. You end up with a really nice rich soil.

Here is part of my yard, almost completely snow free as of today!

Our snowless (mostly) side yard

I took this picture out our upstairs window.  In the foreground, the fenced bit is our dog run. There is a bit of snow still in the dog run area, and a tiny bit near the woods.  My new main garden will be adjoined to the long edge of the dog fence in this picture.